Temperature measurement in the Bright Annealing plants
Bright Annealing Process of Stainless Steel Tube
Bright annealing is a critical production process. If proper annealing is not done tube surface can crack, stained and may lead to easy corrosion. In this process the stainless tube is heated to high temperatures in presence of inert gases. Annealing is done to reduce the hardness of the steel to attain ductility for further processing. The tube comes out of welding, sizing and degreasing unit and finally enters the closed annealing chamber. In the closed annealing chamber the stainless tube is heated to high temperature by induction coils in reducing atmosphere of inert gases like Argon/Nitrogen and Hydrogen gas. After some time the red hot tube exits from the closed annealing chamber and is subjected to rapid cooling. After the tube exits the chamber it finally goes into the last stages of sizing and straightening. The following factors are important for effective bright results of the tube.
The surface of the tube must be thoroughly cleaned to remove foreign particle if present any before entering the annealing process.
The atmosphere surrounding the annealing process should be free from Oxygen. For this a vacuum is created or by carrying the process in presence of dry hydrogen or argon.
The monitoring of the tube temperature is essential for
Effective Bright Surface Finish
To strengthen and maintain a strong internal bond of the stainless tube.
Heating as fast as possible. Slow heat results in oxidation at intermediate temperatures .Hig her temperatures produce reducing condition which is very effective for the final brighter appearance of the tubes. The peak temperature maintained in the annealing chamber is around 1040°C.
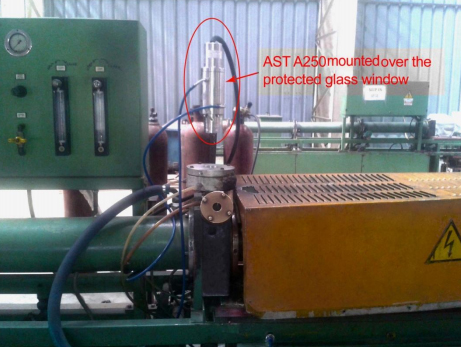
Solution to the Application AST Pyrometer model A450 is suited for this application. The AST A450 is mounted over the safety glass protected observation window of around 10mm thickness. The Pyrometer is wired to temperature indicator which shows the temperature of the tube leaving the induction coil. The following figure shows the installation of our AST Pyrometer system at annealing chamber plant.
The electronic assembly is protected by IP65 rugged stainless steel housing. The pyrometer is provided with “infrasoft” PC software for remote data logging and parameter setting.
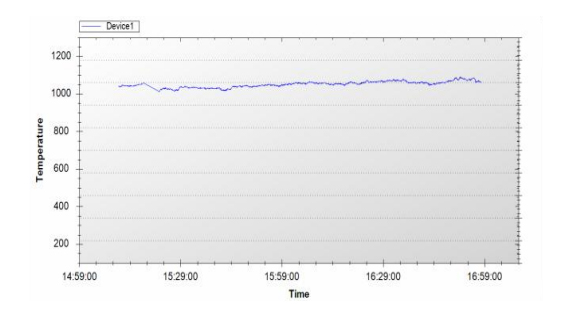
Pyrometer has user selectable analog output 0/4…20mA, 0…10V and digital output RS 232 and RS 485. When connected to PC using USB port, pyrometer works stand alone without any external power supply
Aluminium Profile Extrusion Cooling Rate
High quality extrusion profiles for industries such as automobile, space and aircraft etc. demands the need for special means of process control .The process control is essentialto achieve the quality and mechanical properties of the profile. One of the important parameter in Aluminium Profile Extrusion is the cooling rate.
On leaving the die, the extrusioniscooledthroughtheuseofairorwaterquenches. Thisis a critical step which ensuresif the extruded profile has the correct metallurgical structure, dimensionand strength characteristics.
The mechanical properties of the aluminium profile areachieved in twooperations. Thefirstoneinvolvescoolingof the profile at the correct cooling rate when the section leaves the die and the other is when the profile is followed bya second operation known as age-hardening.
AST pyrometers measurethe temperature of the extruded profile downstream from the die so as to determine the actual cooling rate. It is well established that even minor changes in the cooling rate can deteriorate the mechanical properties of the profile, by creating internal stresses or deformations.
Specifications of the Pyrometer:
- Measurement Range: 200ºC -600ºC
- Emissivity range: 0.1 (200C) to 1.0 (600C)
- High sensitivity
- Accuracy: ±1%
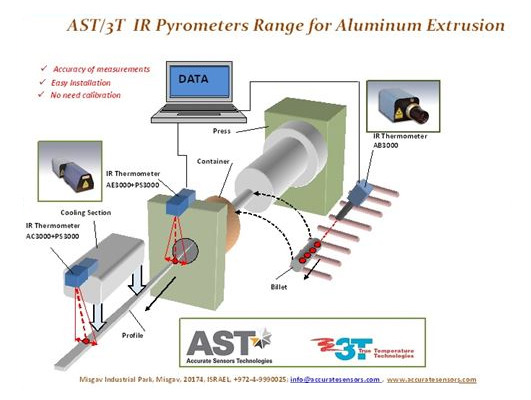
Location of the Pyrometers: There are two possible locations where the Pyrometers can be placed which are as under:
- Above the cooling unit.
- 10-15 m from the press exit above the cooling table.
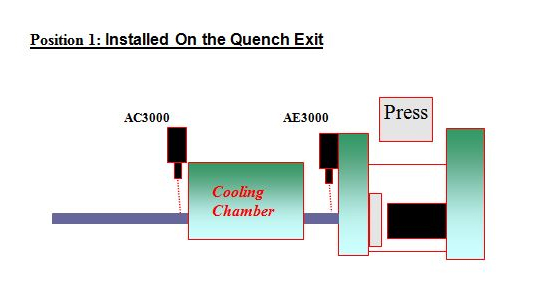
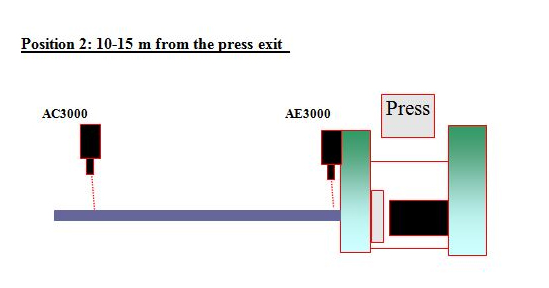
The pyrometer can be installed with scanning systemto improve the temperature uniformity of the profile. Data can be collected and analyzed through analog or digital outputs. An optimal cooling rate can be adjusted based on these readings.
For example, results collected at one of the AST’s customer production facilities showed significant variation of the cooling rate for different extruded profiles with the same cooling conditions. The measurements were provided by two pyrometers, one was located on the press exit and the other above the cooling table see figure 2.
In a specific case of two profiles with different shapes one almost flat and the other tubular, a temperature drop of 169ºc was measured on the flat profile, whereas the tube had a temperature drop of only 93ºc.

Following the above true temperature measurements, an optimal cooling rate or extrusion speed can be adjusted.
Technical discussion
Water quench – In most cases after water quench, profile temperature is lower than 100°Cso it is recommended to use the digital indication out of range or the Analog 4mA signal . The minimum cooling rate can be calculated by the following formula
Cooling Rate (ºC/min) = (∆T°C)/∆t
∆T°C = Tº Exit temperature – Tº Quench Temperature (Or 240ºC)
∆t = L/V
L = Distance between exit pyrometer and Pyrometer after quench – meter
V= Extrusion Speed meter⁄minute
* 240ºC is the minimum temperature we can measure to all type of profile, when pyrometer indicate out of range it means that temperature is for sure less than 240ºC. Main application for pyrometer is after air quench where customer would like to keeprequired cooling rate.Profiletemperature that is cooled by air normally is above 250°C.Our AC3000 will be able to measure it accuratelyand can automatically compensate the shape changes.
Yetin order to get good accuracy in the readings, shadow conditions are preferred as direct sun or halogen/tungsten/mercurial lamps may cause distortion in readings. Note A.
AC3000 with special optics may measure 170°C with target emissivity ε=0.1 (means complicated profile and not tube or flat).
Note B.
FR3000 may measure 145°C with target emissivity ε=0.1 (means complicated profile and not tube or flat).
Conclusion:
The optimal cooling rate for the profile in the extrusion process is an important parameter which affects the physical and mechanical properties of the profile. The mechanical properties of the profile can be improved by adjusting the speed of the profile on the cooling tableor by increasing or decreasingthe air or water flow.
Evaluation of the cooling rates of different profiles between the press exit and other locations further down the production line (quenching, cooling table…) can be achieved by measuring the true temperature of the profile at the lower temperature ranges.
AST Accurate Sensors Technologies Ltd. specializes in non-contact true temperature measurements, offering the extruder a variety of systems that shows the exact temperature in different locations of the press and significantly improves product quality which helps in increasing the productivity
Blackbody
Black Body is the most ideal calibrator of an infrared thermometer. This is because blackbodies have an Emissivity equal to 1.000.
A perfect blackbody only would have an emissivity of 1.000. This would take place in a system where no light or radiation could escape and all the radiation shall remain inside forever. In the real world, there is no such thing as a perfect blackbody for IR thermometry. This is because there would be no opening for taking a measurement in such a system. However, the perfect blackbody is a good prototype for modeling thermal radiation.
Emissivity is the ratio of energy radiated by a particular material to energy radiated by a black body at the same temperature. A true black body would have an emissivity = 1 while any real object would have emissivity < 1. Emissivity is a dimensionless quantity. Every material radiates energy. The amount of radiated power is dependent on the material’s temperature and the material’s emissivity.
IR thermometers make use of this. They measure the amount of energy radiated by an object in an infrared band. This infrared band can vary from 1 micro meter to 14 micro meters. Depending on the wavelength range IR thermometers uses different types of sensors to determine the temperature. They calculate temperature based on this measured power and the material’s emissivity.
Emissivity is one of the major sources of error in infrared measurements. Knowledge of the emissivity of the measured surface is of great value to any user of an IR thermometer. As so, great care should be taken to know the effects of emissivity of the surface when measuring it. Deviation in the assumed emissivity of the measuring target body would lead to significant error in temperature measurement. Proper knowledge of emissivity and background temperature should be considered when measuring a surface temperature. These factors are even more important when using an IR thermometer calibrator. Paying attention to these factors will provide a better calibration and better IR metrology.
New Optical Pyrometer for Measuring the Temperature of Aluminum Alloys
Dr. E. Glassman
3T – True temperature Technologies
Theradion Industrial Park, Misgav, Israel
INTRODUCTION
Improvement in the effectiveness and quality in the modern technological processes employed in the manufacture of aluminum and its alloys cannot be achieved unless the temperature can be measured to an accuracy of ± 0.5 – 1%.
In static processes, where there is a calm object surface, measurements of errors to this order of magnitude have been achieved by contact means using a thermocouple.
In dynamic processes, such as casting, rolling, extrusion etc., accurate continuous temperature control is possible using non-contact, in particular optical, methods. The advanced characteristics of the instruments used in this type of pyrometry (such as high speed, sensitivity, etc.), make it possible to measure relatively low temperatures.
The use of optical pyrometry methods in the aluminum industry is, however, associated with a number of fundamental difficulties, such as:
- the variable emissivity and transmission of intermediate media intervening between the pyrometer and the measured object in the course of measurements;
- the influence of the light reflected from external radiation sources; and
- the fluctuation of objects within the field of view of the optical pyrometer allowing only partial object sighting.
The harsh operating environment of the optical pyrometer – the wide temperature changes, dust and humidity, and the action of variable and permanent electro-magnetic fields – introduces secondary destabilizing factors that need to be corrected by various technical solutions.
All this makes modern optical pyrometry more complicated and therefore more expensive.
Overview of AST / 3T Technology
AST \ 3T development is oriented for a product, which can be the new step in the quite tight market of Infrared non –contact optical thermometers (pyrometers). And the main goal, achieved by our team was development of the system which is able to reach high accuracy temperature measurement of objects with various optical properties.
Optical properties variations of target are the fundamental problem for all non-contact temperature measurements. Different technologies have different approaches to resolve this problem.
Thus, one wavelength pyrometers are able to supply good result in case when the target Emissivity is absolutely constant and pyrometer need recalibration for each change.
Two wavelength (color) pyrometers can work with variable Emissivity without calibrations, but under very strong condition – the target should be Black or Grey physical body. As well known – it is not the most frequent case in industry, as well as in the all nature.
3T technology has started as multi wavelength, and because of original physical algorithms, the pyrometer, being initially calibrated for different target situations, after that can automatically recognize the type of the target and to use the most compatible calibration.
By this way we achieved 1% measurements accuracy. But each unit required being initially on line calibrated.
With rising of 3T sales and acquiring more and more experience in industrial applications we have developed Standard Calibration Databases for typical applications. This Database, being saved in pyrometer memory while production stage, allowed to customer to use our device as Plug & Play and avoid necessity in initial on site calibrations. We have developed Application SW, and by means of it customer got the possibility to install Database by his own, record data loggers of measurements, build Real temperature and Real Emissivity trends.
In the next stage we have found clear mathematical dependence between optical signals for different wavelength and objects optical properties, thus arise possibility to use pyrometer not only working in Discrete mode with Database, but also in Analytic Mode by using Analytic coefficients, specified for each application. It makes results more consistent, stable and allows performing of fine tuning by coefficients modification.
Now typical 3T Pyrometer measurements procedure may be described by follow:
- a) For known applications – instrument working in Analytic mode Plug & Play with standard coefficients, without any customer’s intervention.
- b) For unknown applications – initially started in Discrete mode for new Calibration Database acquisition. After that system calculates new Analytic coefficients, which can be used as typical coefficients for this application.
High sensitivity, high accuracy and target properties independence allowed us to take a step into very difficult measurements branch of non-ferrous metallurgy – Aluminum industry, where most of the objects are very bright, low temperature and have very variable optical properties.
Further development showed us the way how on the base of existing algorithms to minimize the number of required wavelength, simplify the design, and reduce the cost of the device.
Today 3T Pyrometer working with our original technology on the base of 2 wavelength and can be used as set composed from different elements: Camera only + PC; Camera assembled with scanner; Camera + Display; Camera communicated with PLC through Analog Output or Serial output and also as the number of cameras Serial communication with one registering device..
Instrument can be accomplished with few different types of application SW.
The main amount of our pyrometers is being used as Plug & Play devices in Aluminium industry for Extrusion of profiles, Hot Rolling, Forging, casting of aluminium, Continuous casting. But our applications for brass, steel, grey iron, titanium are also successful. Technological potential of our team allowed us to participate in development of Silicon wafers processing machine, in cooperation with another Israeli companies.
We designed Reflectometer –Pyrometer for current monitoring of the Silicon wafer temperature with high accuracy. Unfortunately, the recession which has a place in Hi-Tech during early 2000 does not allow us to transform this project to the serial industrial application.
In present time we have the number of models, which are covering temperature range from 200° C to 3000°C, with measurement spot size from 2.5mm for high temperature to 20mm for low temperature (diameters mentioned for 1m distance).
The temperature range of each model is quite flexible and, by optics modification we can find the optimal model and optimal conditions for the range, required by customer.
Real Temperature Parameters For Isothermal Extrusion
Prepared By Boris Shtarker, Eduard Hodos, Ofer Yoely, 3t True Temperature Technologies, Misgav, Israel.
Abstract — The Main Parameters That Must Be Controlled For Isothermal Extrusion, And To Achieve The Optimum Metallurgical Properties In The Profile, Are The Taper Heating Of The Billet, The Die Exit Temperature, And The Temperature Of The Profile During Cooling.
This Paper Discusses Different Ways To Achieve Isothermal Extrusion, Including System Requirements And Different Methods Of Temperature Measurement.
Introduction
In The Last Few Years, Several Different Closed Loop Isothermal Extrusion Systems Have Appeared On The Market. Systems Differ In The Hardware Used And The Algorithms, With User Opinions Varying Regarding The Performance Of Each System.
Many Tests Have Come To The Same Conclusion. The Most Important Parameter To Achieve Isothermal Extrusion Is Accurate Temperature Measurement. The Most Common Reason For Failure In Many Systems Was Inaccurate Pyrometers.
Parameter Measurement
Accuracy Problems Arise In Profile Measurements When The Profile Exhibits Temperature Variations Across Complex Sections, Or Differences In Temperature Between Small Profiles From Multi-Cavity Dies. This Effect Occurs Most Often When The Pyrometer Used Has A Large Spot Size And Gives Averaged Measurements. In Order To Avoid This, An Effort Should Be Made To Concentrate On Measurements Using A Small Spot Size With The Possibility Of Automatic Targeting Of The Pyrometer On The Hottest Point.
Effective Billet Taper Heating Control Requires An Accuracy Of +/- 5° C (10° F) And Several Measurements Along The Billet Axis.
The Best Way To Achieve The Required Parameters For Billets, Is When The Remote Pyrometer Is Several Meters Away, With The Billet Area Free From Obstructions. This Also Avoids The Danger Of The Pyrometer Being Affected By Heat From The Billet.
The Dilemma Of Repeatability Or Accuracy
Examination Of The Performance Of Some Of The Isothermal Systems And Pyrometers Used, Shows That Due To The Inadequate Accuracy Of The Pyrometers, Manufacturers Often Promote The Theory That Repeatable Temperature Measurement Is Good Enough
Key Arguments And Recorded Experiences That Counter This Theory Are Discussed Below:
When Looking On (Figure 1.) One May Ask If Repeatability Is Good Enough, But If There Is Always A Discrepancy Of 15-30°C See (Figure 3.) Is It Possible To Reach The Peak? Will You Always Be Somewhere Below Or In The Range Where Quality And Metallurgical Properties Of Profile Are Impaired?
When The Method Is Solely Based On The Repeatability Of The System, Any Changes Within The Press Environment Will Affect All The Saved Data, And Tests Will Have To Be Repeated To Ensure The Correct Process Control.
Profile Positioning (See Figure 4.), This Is The Most Common Change That Will Happen Between Extrusions From The Same Die Each Time It Is Extruded. Different Locations Will Give Different Temperature Readings. All Of The Data Base Will Be Invalid, As It Was Based On Different Temperature Readings.
The Profile Quality Will Have To Be Re Verified, As It May Be That The Measured Temperature Is Now 30°C Higher Than The Last Time (See Figure 3.). All The Quality Process Parameters (Speed, Pressure, Billet Temperature) Must Be Changed.
With Multi Cavity Dies, There Is Frequently A Difference In Temperature Between Profiles Coming From The Die.
Extruders Target
A Number Of Different Methods And Equipment Are Available In The Market For Temperature Measurement In The Aluminum Extrusion Process. The Basic Question To Be Asked Is What We Are Targeting? Are We Targeting The 80 % Of Extruded Profiles, Which We Can Already Extrude At The Optimum Parameters, Or The 20% More Complex Ones? We All Probably Agree That It Is A Waste Of Money To Invest In Something That Does Not Contribute To Our Aim. We Need To Focus On The 20% Difficult Profiles Where Accurate Measurements Are Needed For Maximum Production.
Practical Experience, Aluminum Profile. – At The Exit Of The Press And Downstream.
Two Different Approaches Have Been Tested In The Field, Wide And Narrow Spot Measurement.
With Wide Spot Size Measurement Pyrometers Use A 50-90 Mm Spot Size From 1 Meter. The Camera Collects Energy From A Wide Area, Therefore The Measurement Is Less Affected By Profile Location The Parameters Within The Processor Are Set To Correctly Measure The 80% Mentioned Above, And Probably Will Have Errors Of Up To 50°C.
This Occurs Because Of Differences In Temperature Between Different Profiles In Multi-Cavity Extrusion (Figure 3.), Temperature Variations Across The Profile (Figure 4.), Different Alloys Within The Common 6000 Series, Or, When The Profile Is Smaller Than The Pyrometer’s Field Of View. (Figure 5.) – In This Case There Is Often A Location Error.
With A Narrow Spot Size Sensor, Accurate Measurements Result Only If The Profile Is In The Field Of View. Data Collected During A Benchmark Test Last Year Demonstrate The Error Of Using Wide Spot Size Pyrometers.
In Recent Years Most Customers Reported That Even Today When Level Of Accuracy Of Measured Temperature Has Jumped, The Main Obstacle To Having Their
System Running Well Is The Accuracy And Repeatability Of Pyrometers.
Shows Field Data Of A Simple Profile At The Press Exit. Temperature Was Measured By Small Spot Size Pyrometer. This Provided Excellent Accuracy. A Sensor Was Connected To A Scanning System.
On Figure 6 Data Difference In Temperature Between Highest Temperature And Lowest Temperature Exceeds 20°C (68°F).
Data May Explain Why In Some Closed Loop Systems Installed In Europe, Extruders Noted That On 10-15% Of Profiles They Couldn’t Run The System Due To Pyrometer Inaccuracy.
Figure 6 Profile Temperature At The Press Exit
Practical Experience Aluminum Billet
For This Application It Is Impossible To Achieve Good Results Using Simple Pyrometers Because Of Large Variations In Emissivity And Surface Spectral Properties Between Billets.
Two Different Approaches Have Been Introduced To The Market. The First Uses An Emissivity Transformer And Therefore The Sensor Is Located A Few Millimeters From The Hot Billet. The Second Locates The Sensor 1-4 Meter From The Billet – Similar To Profile Measurement.
With The First Method We Have Again The 20%-80% Question. If The Billet Is Scalped And Very Shiny, The Accuracy Drops Immediately With Up To 40-°C Deviations. This Is Just The Application Where Accuracy Is Needed For Our High Quality And Expensive Product!.
With The Second Method, Its Big Advantage Is The Location – Far Away From Hazards. Simple To Install, Easy To Maintain. It Covers The Full Range Of Billet Surfaces (Emissivity) From Dark Black To Shiny Scalped Billet – Covering The Full 100% And Particularly The Most Important 20% Of Production.
All Existing Optical Measurements Give The Result Of Billet Heating After The Procedure Has Been Completed, On The Exit From The Furnace, And In The Best Case This Information Is Available For Modifying The Next Heating Cycle. Control Of The Heating By The Pyrometer Allows Direct Involvement In The Heating Process Without Having To Take Into Consideration The Reliability Of The Measurements, As Is The Case With Contact Thermocouples.
Billet Test Field Figure 7 And 8, Explains The Need For Accurate Measurements Of Billet Temperature.
Measurement Of Temperature Along The Billet Helps The Extruder In Two Ways – First To Monitor Billet Furnace Performance And Control It, Second And Most Important, Data May Be Transmitted To A Closed Loop System, And Will Immediately Correct Pressure And Speed For The Current Billet.
Aluminum 1000 Inductive heater
Figure 7. Billet Temperature Measurements
Figure 8. Billet Temperature
Conclusion
Isothermal Extrusion Systems Must Use An Accurate Pyrometer, The Method Of Repeatable Sensors Is Not Always Repeatable In Practice Nor Applicable In Practice For The Most Important Profiles.
Comment From Extruders That Are Using These Systems Are Usually, “Yes It Working, But . . . “Analyzing The “But” Shows That It Ranges On 10-20 % Of Production.
Achieving Accurate Temperature Measurements Is A Hard Task. Some Of The Companies In The Field, Have Chosen To Make A Detour.
At The Very End There Are No Detours. One May Manipulate Numbers, Explain In Detail Why Repeatability Is Best, You May See Improvement Of Productivity, But It May Be That Quality As Been Reduced – At The End Of Day, Your Production And Quality Are On The Table.
The Choice Is Between Compromising With The 80% Or Become One Of The 20% Market Leaders.
References
Measuring The Temperature Of Aluminum Alloys
Dr. E. Glazman
Closed Loop Isothermal Extrusion
Jan Ingvorsen, Alu Mac
The 80%: 20% Question
Accurate Temperature Measurement
Boris Shtarker & Ofer Yoely, 3t True Temperature Technologies, Misgav Israel Acknowledgement
The Authors Wish To Acknowledge Klil Industries And Mr. Hilel Frenkel For Their Assistance During Tests.
Continuous Control of Thermodynamic Temperature in Extrusion, Rolling and Forging of Aluminum Alloys
Prepared by : Dr. E.D. Glazman, Chief Scientist, R. Goshen, T. Kornfeld, S. Levy, H. Damir
ABSTRACT – Dynamic nature of particles behavior in extrusion, rolling and forging of aluminum and its alloys almost totally rules out the possibility for contact thermometry under continuous control of thermodynamic temperature. The authors examined the basic potentialities of non-contact passive optical pyrometry for these processes. Method of optical pyrometry which provides for thermodynamic temperature measurement at unknown and varying emissivity in the range of 200-1000ºC with maximal tolerance of approximately 1% are presented in the report. Results of industrial use of designed pyrometry systems obtained over a period of years for aluminum and its alloys in extrusion in a number of large companies in the USA, Europe, Canada, Australia etc. are discussed
Billet And Bar In Forging Process
Temperature Measurement Of Aluminium Billet And Bar In Forging Process
Prepared by: Boris Shtarker and Ofer Yoely
Introduction
Temperature control plays an important role in any hot-working operation. Contact methods of measurement are often difficult as the probes tends to wear and maintenance of the probes can be time consuming and expensive. Non-contact measurement using infrared sensors has been tried many times but with only limited success on aluminum because of the low and variable emissivity. The 3T company in Israel has successfully developed an infra-red temperature measurement system that uses several different wavelengths and complex algorithms to accurately measure the temperature in the extrusion, forging, hot-rolling and casting of aluminum alloys.
The P3000 pyrometer joins the family of innovative products that have been developed by 3T – True Temperature Technologies for use in the aluminum forging industry.
Accurate measurement of aluminum parts during forging process is vital to ensure quality product. It is well established that even minor changes in the billet temperature can cause deterioration in the mechanical properties of the forged part, by creating internal stresses and deformations.
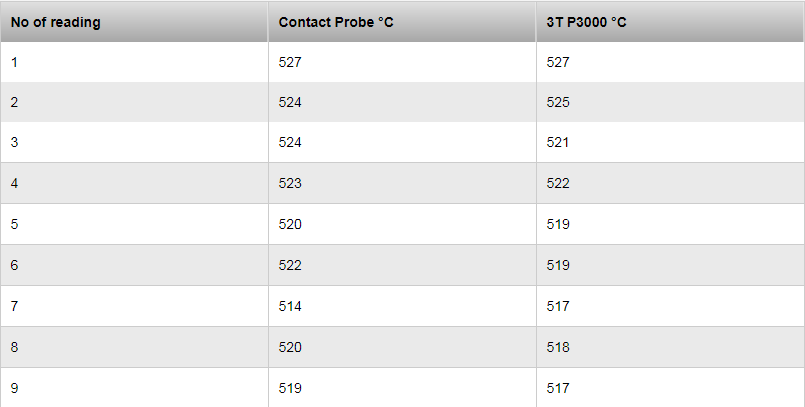
For that reason, AUTOMOTIVE PARTS MANUFACTURERS demand accurate measurement of each forged billet coming in and out the press. Due to long response time of contact probe, and frequent probe tip maintenance, measurement with thermocouple is not applicable – a few seconds for each measurement will be very expensive in mass production.
Unlike contact probe 3Ts non-contact optical pyrometer, will measure temperature within less than a second, and therefore is the most suitable instrument for forging application.
Furthermore 3Ts optical non-contact pyrometer enables automatic, continuous, maintenance free temperature measurement.
Non-contact temperature measurement provides accurate consistent reliable reading, which can be recorded (via RS232 communication or analog 4-20mA), for quality assurance purposes.
Furthermore 3Ts optical non-contact pyrometer enables automatic, continuous, maintenance free temperature measurement.
Non-contact temperature measurement provides accurate consistent reliable reading, which can be recorded (via RS232 communication or analog 4-20mA), for quality assurance purposes.
Technical specifications:
Measurement Range: 300°C – 1000°C (572°F – 1832°F).
Emissivity range: 0.1 (300°C) to 1.0 (1000°C)
High sensitivity and accuracy: ±1%
Locating the P3000:
There are a few possible locations for 3T-pyrometer model P3000:
On the exit from the heating furnace
On the entry to forging press
On the exit from forging press (for temperature control of forged parts).
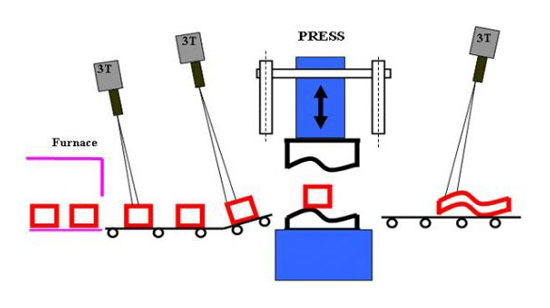
The pyrometer can be installed also on a linear motion scanning motor in order to measure and improve the temperature distribution uniformity of the billet. Data can be collected and analyzed through analog or digital outputs.
Conclusions:
The measurement of the temperature of the aluminum billet in the forging process is an important parameter affecting the physical and mechanical properties of the product. Therefore, when safety involved measurement of the temperature of each piece is necessary and mandatory.
3T – True Temperature Technologies Ltd. specializes in non-contact true temperature measurement, offering pyrometers that show the exact temperature in different locations of aluminum forging and extrusion process, and significantly improving product quality while increasing productivity.
Comparison between 3T P3000 and contact probe (thermocouple)
Quartz Fusing Application
Application: Quartz Fusing using Infrared Non Contact Pyrometer AST AL514
The chemical composition of quartz and silica glass is similar. Both consist of Silicon Dioxide but there exists a significant difference among their structural composition. Silica glass commonly known as glass is amorphous while quartz is crystalline in nature. This change in the structural composition is responsible for the change in the properties of these materials as well. The fusing process of the quartz is different from fusing process of glass. It has high melting point like a metal. It does not have a distinct melting point as crystalline materials, but softens over a fairly broad temperature range. This transition from a solid to a plastic-like behavior, called the transformation range, is distinguished by a continuous change in viscosity with temperature.
Role of temperature:
The flame temperature plays a crucial role during the quartz tube fusing process. The right hot flame is essential for maintaining the right process temperature. Wrong flame temperature like heating for longer duration or too much heating leads to the formation of bubbles in the melted region. The failure in the joint is also a result of the contamination caused during flame heating. Oxy hydrogen flame is mostly used in this process as it is useful in achieving the right temperature and provides clean flame region for the fusing process. As Quartz is crystalline entry of foreign element in the matrix can easily cause dislocations near the crystal boundaries. The clean flame of hydrogen is useful as compared to the contaminated flame containing loose Carbon ions. The carbon ions can mix with the matrix and may cause contamination.
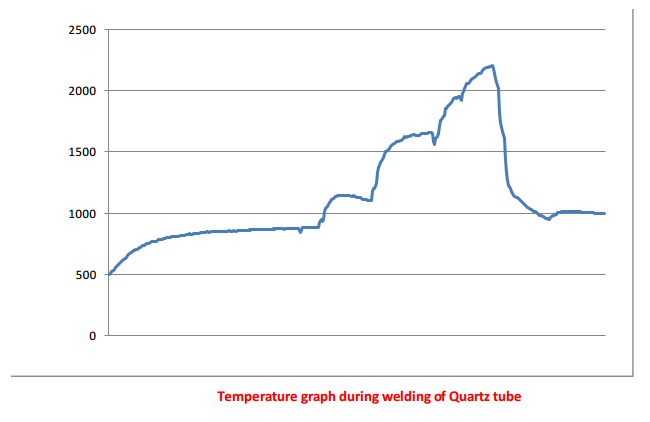
In quartz tube fusing application, the temperature rises above 2000°C. Using infrared pyrometers temperature of both the surface and depth of quartz tube can be measured. Since in this application the surface temperature of the tube is important, a pyrometer working at 5.14um is recommended. Quartz tube with 2mm wall thickness is opaque at 5.14um wavelength. Also this wavelength makes no effect of O2-H2 flame. Since glass is a poor conductor of heat, and can change surface temperature rapidly; the pyrometer should have a short response time.
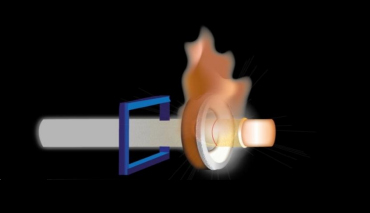
The below figure shows the quartz fusing application.
Solution to the Application
We offer AST AL514 model for this application. This pyrometer provides the advantage of noncontact temperature measurement of glass surfaces and quartz surfaces. The AST AL514 pyrometer is used for target temperature ranging from 400°C to 2500°C. The electronic assembly is protected by IP65 rugged stainless steel housing.
AST AL514 has a fast response time of 20msec. AST AL514 is supplied with laser targeting light or through the lens sighting for precise targeting. It has USB output and “infrasoft” PC software for data logging and remote parameter setting. When connected to PC using USB port, pyrometer works stand alone without any external power supply.
Pyrometer has user selectable analog output 0/4…20mA, 0…10V and digital output RS 232 and RS 485.
